After the spring One Room Challenge, for which we renovated our dining room over a 6-week period, I swore I was going to take a break from beautifying our home. But then I got an opportunity to review a new mattress and that got me thinking it was time to do a mini makeover of our neglected and "tired" master bedroom (or principal bedroom if you prefer, because it sounds less like the woman is there to serve).
I opted for a "mini" makeover because we have one of those ridiculously large suburban bedrooms with room for a sleeping area, a sitting area and then some. It would take too much time and resources (including my limited mental resources) to tackle the whole space right now. With a new mattress coming, we decided to tackle the sleeping space in the room.
For our big foyer makeover last fall, we took the antique armoire previously used for clothing in our bedroom and put it in the downstairs hall. It was like robbing Peter to pay Paul - I love the way the armoire looks in the hall, and how it houses our mittens and scarves in winter, but it left a big blank space on the wall in our bedroom. As you can see, above, our bedroom was not decorated based on any cohesive design plan. We bought curtains without thinking about bedding. Plus, our plaid comforter is literally 18 years old. It was a wedding gift and while I'm amazed at how durable it has been, it really needs to go. (We have switched to different ones over the years and come back to this comforter just because it's heavy enough that it stays in place and also it washes well.)
This mini bedroom makeover was inspired by the fact we've been wanting a king bed for a very long time. Our queen bed wasn't giving us the space we needed. (Somebody has loose elbows!) We bought an inexpensive bed frame months ago from IKEA but we couldn't find the right mattress - something affordable and yet eco-friendly. Recently the stars aligned and I had the opportunity to review the new Douglas mattress from Novosbed. I'll tell you more about that in a part two blog post in a couple of weeks, once we've had a chance to try out the mattress and dress the bed up all pretty.
But the showstopper of the sleeping area was to be wallpaper - something eye-catching but calm enough for a 16-foot feature wall. I was drawn to the gorgeous removable wallpaper options from Walls Need Love. I had been drooling over the Walls Need Love Instagram feed for a couple of months. I highly recommend having a (long) look, because you'll get a good idea of how people have incorporated this stunning wallpaper in their well-styled homes. Walls Need Love also has very cool murals and wall decals for a quick yet striking room update.
We considered a number of wallpaper design options, like this beautiful Daisy Delight Removable Wallpaper. How fun would that be? Ultimately we chose the Sketch Floral Removable Wallpaper. Here's my thinking on that - basically I wanted a wallpaper in a neutral colour so that we can change our bedding and curtains in the years to come without being restricted to colours that match the wallpaper (which I don't plan to remove for a very long time). Also, although the Sketch Floral is high-impact, to me it reads as a peaceful pattern overall. With a large wall like this, particularly in a bedroom retreat, peaceful is where it's at. We're really happy with how it turned out.
How To Style A Dresser
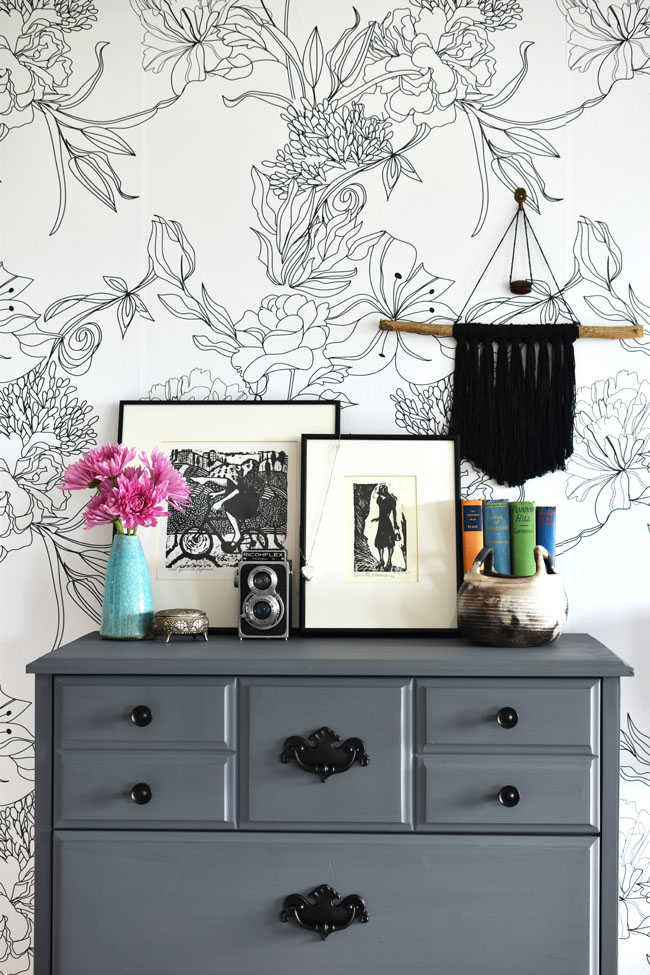
As a quick aside, I'd like to offer up a few tips about styling your dresser. Sometimes inspiration doesn't come calling without a little help. I looked through all kinds of decor magazines on my magazine app, Texture, to see how the design and decor experts style their dressers. Do you think I could find more than a couple of styled dressers? What gives? Is photographing the dresser not in style? Anyway, I turned to the Internet, googled "how to style a dresser" and came up with a few images to get my brain churning. A lot of the pictures were for long, low dressers though. So I kind of winged it using some of the usual suspects.Common elements of the styled bedroom dresser include books, flowers, artwork of various sizes (hung on the wall just above the dresser or tilted against the wall). And then there are the practical items. Think, what will I be using my dresser for? Maybe it's perfumes (I don't use them), jewellery (find a unique holder to display it) or cosmetics (I like to keep them in the bathroom). It's also a good place for items that are meaningful to you (the person or persons who find relaxation in the room). Family photos are a good start. Add smaller items of various shapes in the front of the dresser - a pretty little jug, a special watch, a little pewter box. I mainly stuck to a black and white theme to match the wallpaper. Then I added some muted colours via vintage hardcover books my mom gave me and a blue/green vase with purple flowers. I also draped a #1 Mom silver locket the kids gave me over one of the artworks and added a vintage camera some friends gave us.
I knew all along that I wanted a fun boho yarn wall hanging in our bedroom. I decided to make a miniature wall hanging to hang just above the dresser. Again, with budget being a factor, I wanted to create an inexpensive DIY yarn wall hanging. And boy did I! This cute little guy cost me less than $2 to make! I'll share a tutorial one day if anyone is interested.
We kept our original table lamps, which have black bases with a reddish hue to them. We just switched out the tan lampshades for black and white lampshades.
We previously had matchy-matchy dark wood end tables. Not sure why. But we decided to use the black IKEA table that was placed at the end of the bed as an end table on the dresser side of the bed. One, to be less matchy-matchy, but also because a rectangular end table next to a rectangular dresser just looked odd and boring.
Sanding the dresser and painting it with two coats of paint took just a few hours. Putting up the peel and stick wallpaper from Walls Need Love took another half a day (and would be quicker next time - we had a slight learning curve having only used paste-the-wall wallpaper before). Making the yarn wall hanging took less than 30 minutes. All in all this mini bedroom makeover took about a day's work total, making it a great weekend warrior project.
I feel like we got some good impact with just a few changes in our principal bedroom. Stay tuned for more about the bed and bedding in the next couple of weeks.
Could your bedroom retreat use some sprucing up? Where would you like to start?
Pin it for later:
*This post is sponsored by Walls Need Love. All opinions are authentic and my own. Thank you for supporting the awesome companies that partner with Woman in Real Life.


Hi Joann,
ReplyDeleteWow! What a change! It looks like a new bedroom. Great products that allow you to do this in a weekend. Love the colour of your dresser and the wallpaper. Everthing comes together. Also love the boho vibe.
We are actually planning to paint our bedroom soon.
By the way, who plays the guitar? :o)
Hi Gabriela, Thank you! It definitely does look like a new bedroom, although we have some work still to do on the other end of the room. The wallpaper and the mineral paint certainly make a quick change easy. Good luck with your bedroom! That guitar is actually my daughter's but she is just learning. My husband plays. :)
DeleteWow! What a difference paint made for that dresser. Love it! Would never think to paint it - need to look at a dresser I have here that could use a makeover. The wallpaper is awesome too. Totally jealous of that room in a good way :)
ReplyDeleteAww, thanks so much Kerrie! It's an easy one to duplicate, especially if you have a dresser lying around that could use a paint job. :)
DeleteI love this! The wallpaper looks awesome and that dresser makeover has me totally inspired- nice job!!
ReplyDeleteThanks so much Heather! I appreciate your kind comments. :)
DeleteI love the paint and the wallpaper is very cool and unique. The black and white colour scheme makes everything look comfortable but also quite chic too. Nice quick makeover.
ReplyDeleteThanks so much Paula! Comfortable but chic is just what we were going for, so I'm happy that's how it feels to you. :)
Delete